Staircase Installation Help and Tips
Staircase Installation Help and Tips
We have taken the most common asked home improvement questions over time about how to install certain products and included them on these pages.
1. How do I install the stair handrail to attach the handrail to the fittings and newel posts?
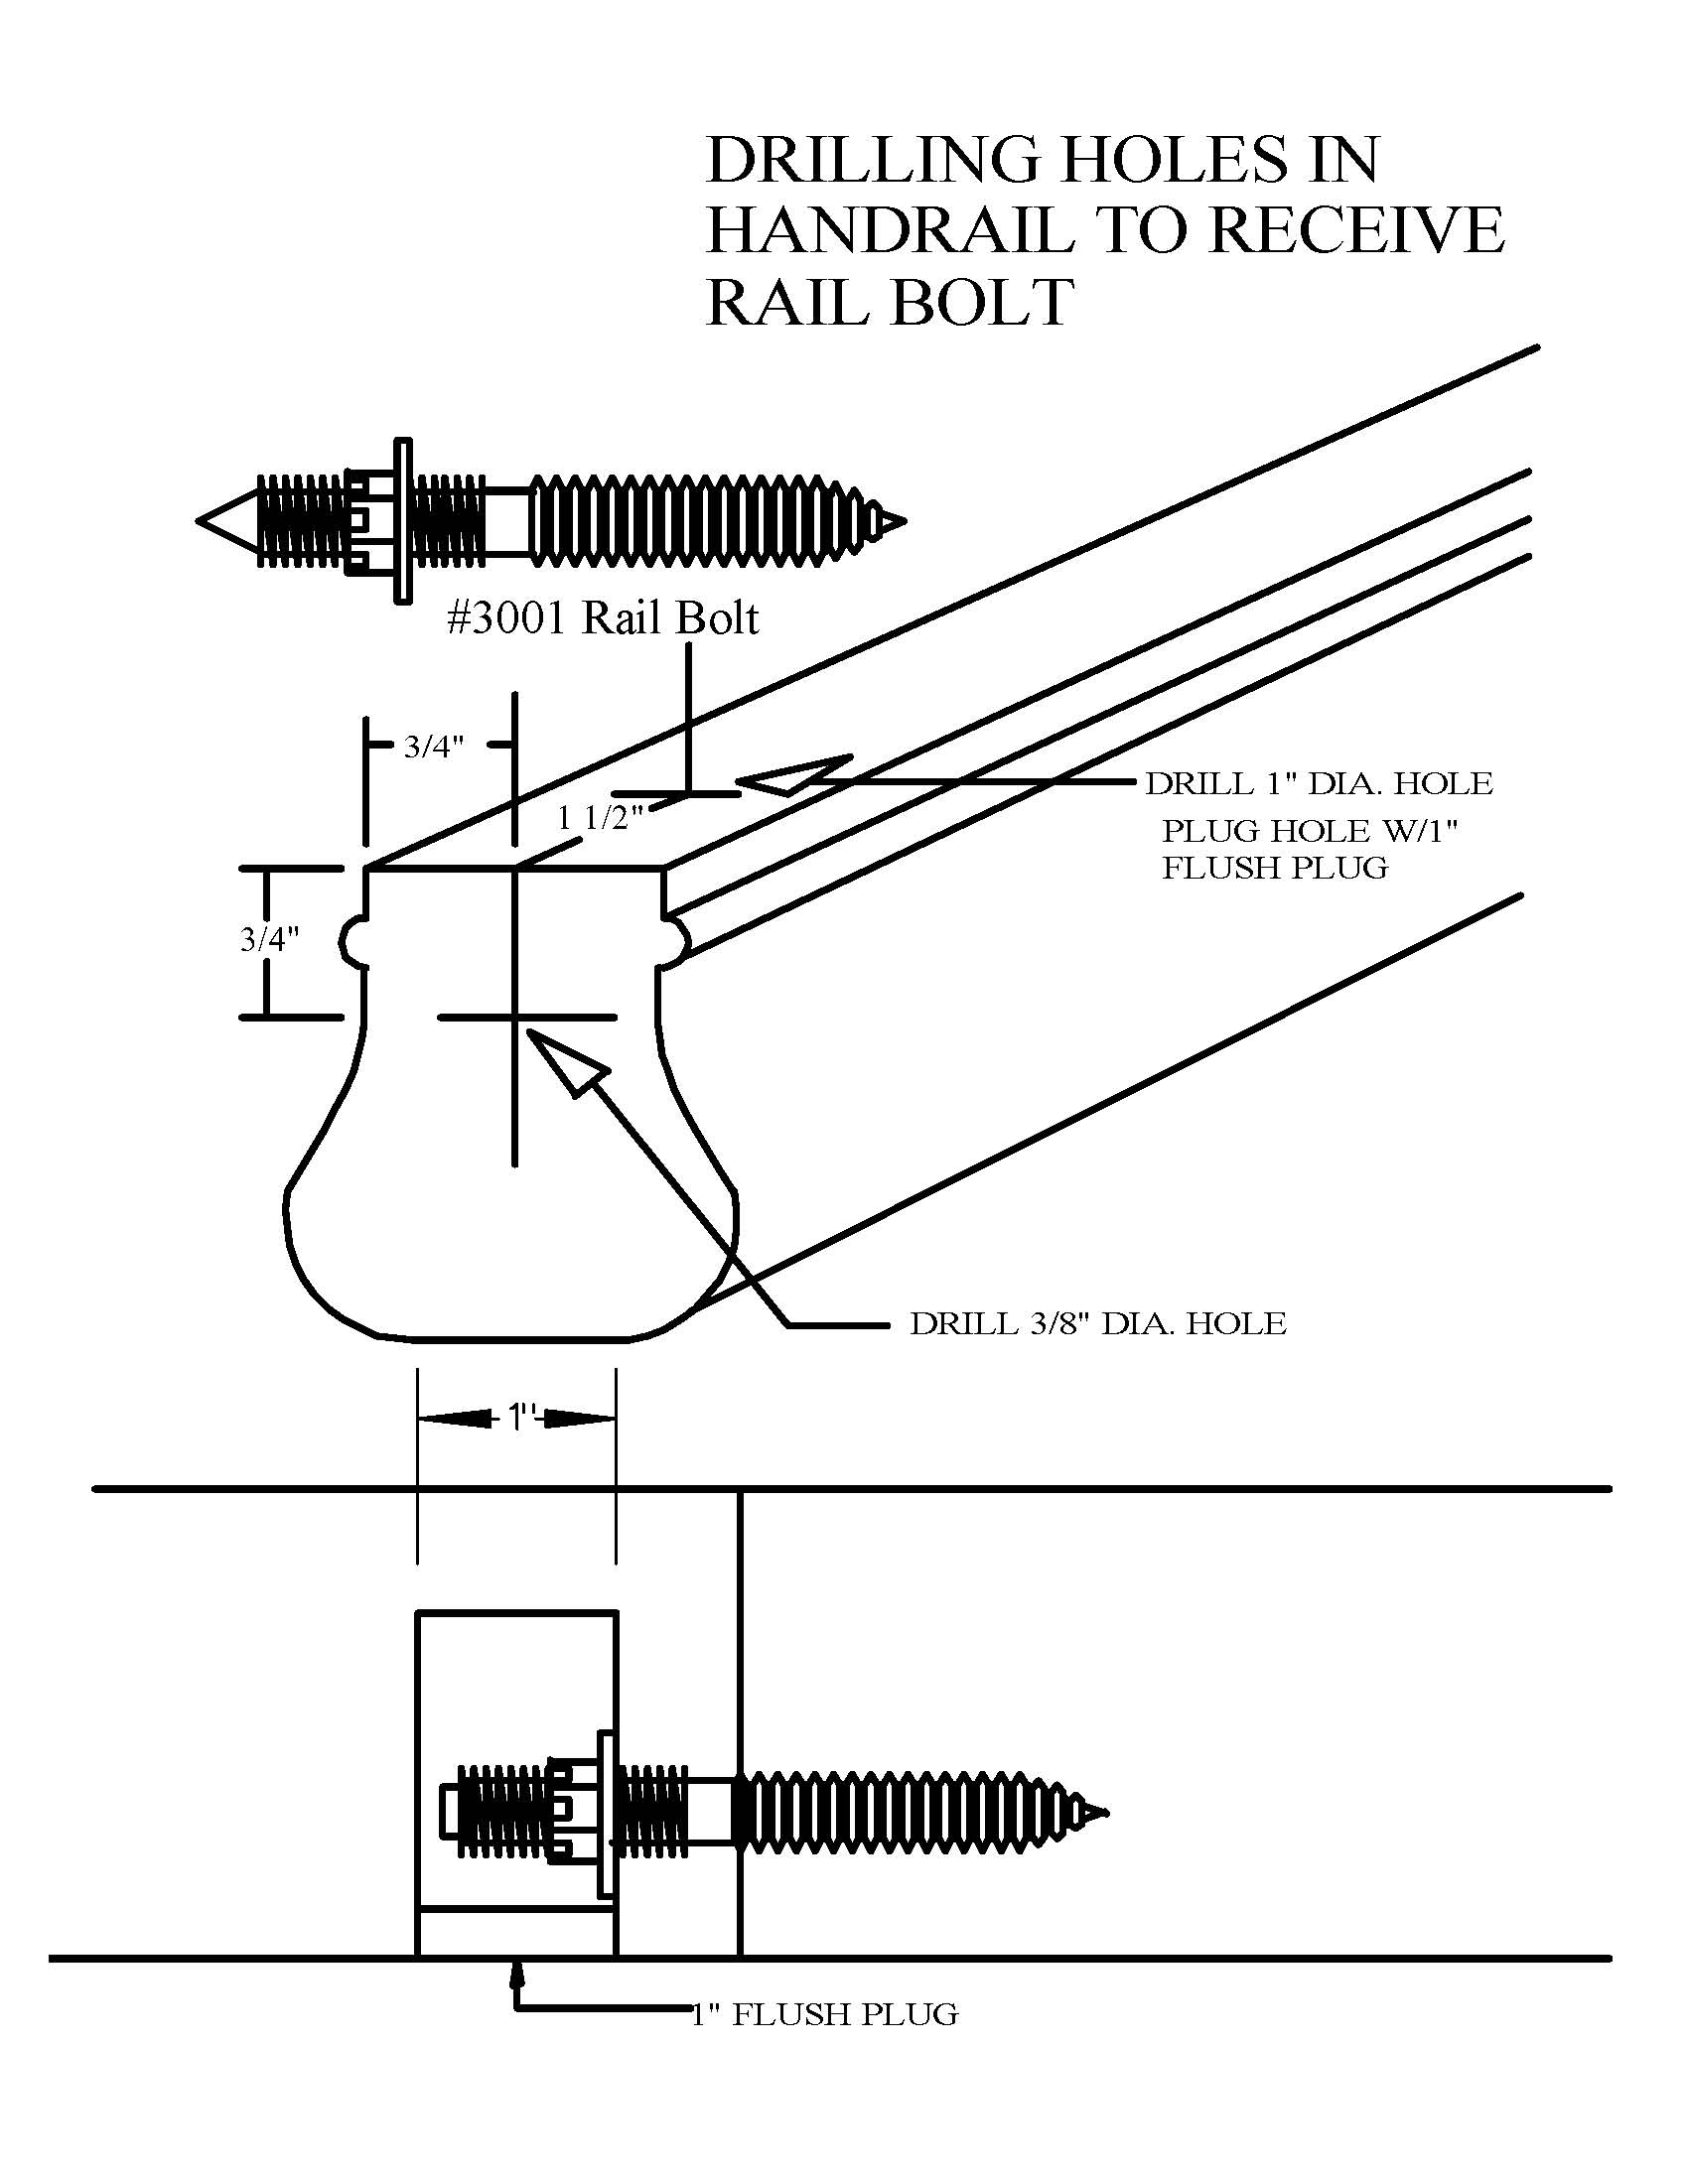
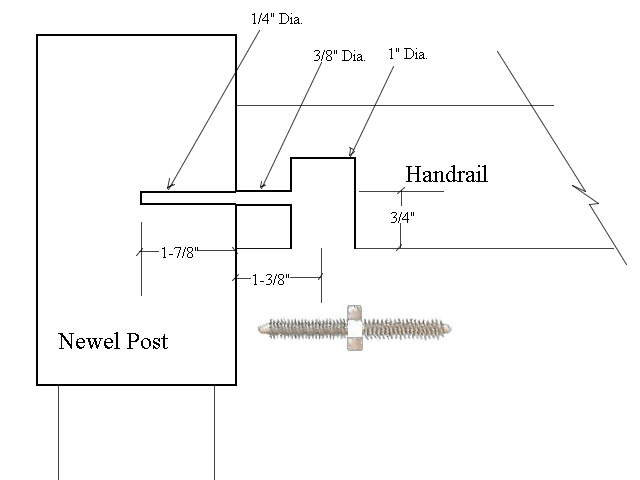
Fittings include rail bolts which are a 3-1/2” hanger bolt with nut and washer. Measuring 3/4” up from the bottom of the fitting or stair rail, drill a 1/4” hold to receive the wood-threaded end of the rail bolt. Leave the railbolt extended at least 1-1/2” from the fitting or handrail. Measuring in 1-1/2” from the receiving end, drill a 1” hole about 1-1/2” deep in the handrail. Again, from the edge of the handrail, measure up center 3/4” and drill at least a 7/16” hole on the receiving piece through to the 1” hole. The rail and fitting are then glued, aligned and, using a 1/2” closed wrench or 2900W railbolt wrench, nut and washer the two pieces together. Finish with a 1” flush plug included with your fitting.
2. I am attaching my rail to a wall with a rosette and the railbolt isn’t long enough to make a secure connection.
Simply use the 3000-5 5” rail bolt which are used with rosettes and by some for newel-to-floor connections.
3. How do I attach the handrail to the newel post?
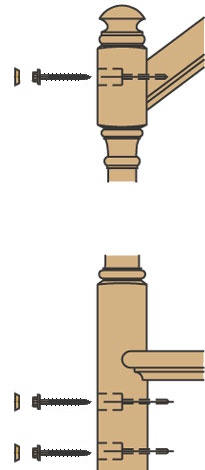
When you install a stair handrail to the post, the strongest connection is made with the rail bolt using the same directions as outlined above. Another option is to use hex head lag or wood screws by pre-drilling screw holes through the newel post and lagging to the newel (for guardrail/balcony runs). Or, you can drill a 1” hole under the handrail and toenail, screwing a lag or screw into the newel post. The 3301 rail and post fastening kit is one of the home improvement accessories available for this type of installation.

4. I am bending my own handrail. What glue is recommended?
When you install a stair handrail and want to bend your own, the best results come from using Weldwood’s plastic resin glue. This comes in a 12 oz. plastic jar as a brown powder form; simply add water until it is thick and soupy. This is a slow-drying glue that gives the woodworker time to make his bend without having to rush to bend before drying.
Weldwood’s plastic resin glue is easy to sand once dried and works well with all stains and finishes. The other plus is that bending rails do not have the “spring back” factor happen as drastically as with the typical white wood glues. Weldwood’s plastic resin glue can be found at any Ace True Value Hardware store.
5. How many wall brackets should I use in a wall rail and is there any guidelines on installing a wall rail?
It is recommended or required in some code jurisdictions that wall rail brackets should be installed every 48” on center average. (Don’t hesitate to mark the wall at the appropriate railing height with a faint chalk line before you begin.) For an 8-foot long wall rail, that translates into three wall rail brackets: one at each end and one at center. For a visual aid of a home owner installing a wall mounted handrail, click here: SMA Visual Interpretations
6. What is the correct way to layout balusters?
When it’s time to install a stair handrail, balusters must be installed so that a 4” sphere cannot pass through. For Iron balusters, the maximum “safe” layout pattern would be 4-1/4” on center. Of course, ensure that each baluster is placed so that each one stands at a vertical line, top and bottom, by using a level.
- 1-1/4” wood balusters can be laid out at 4-5/8” on center maximum, or 4-1/2” on center (wider for S4S).
- 1-3/4” wood balusters can be laid out at 4-7/8” on center maximum, or 4-3/4” on center (wider for S4S).
- Open treads would require that three balusters per tread average be installed.
7. How do I install boxed newels with the attached mounting block?
The mounting blocks were added in mid-2005 to aid in installation (except the Holmes series). The blocks can be rail-bolted to the floor, sure-tites can be used, or toe-nailing with hex head lag screws. Once the blocks are installed, the box newel can be cut to height and glue/nailed or screwed to the block.
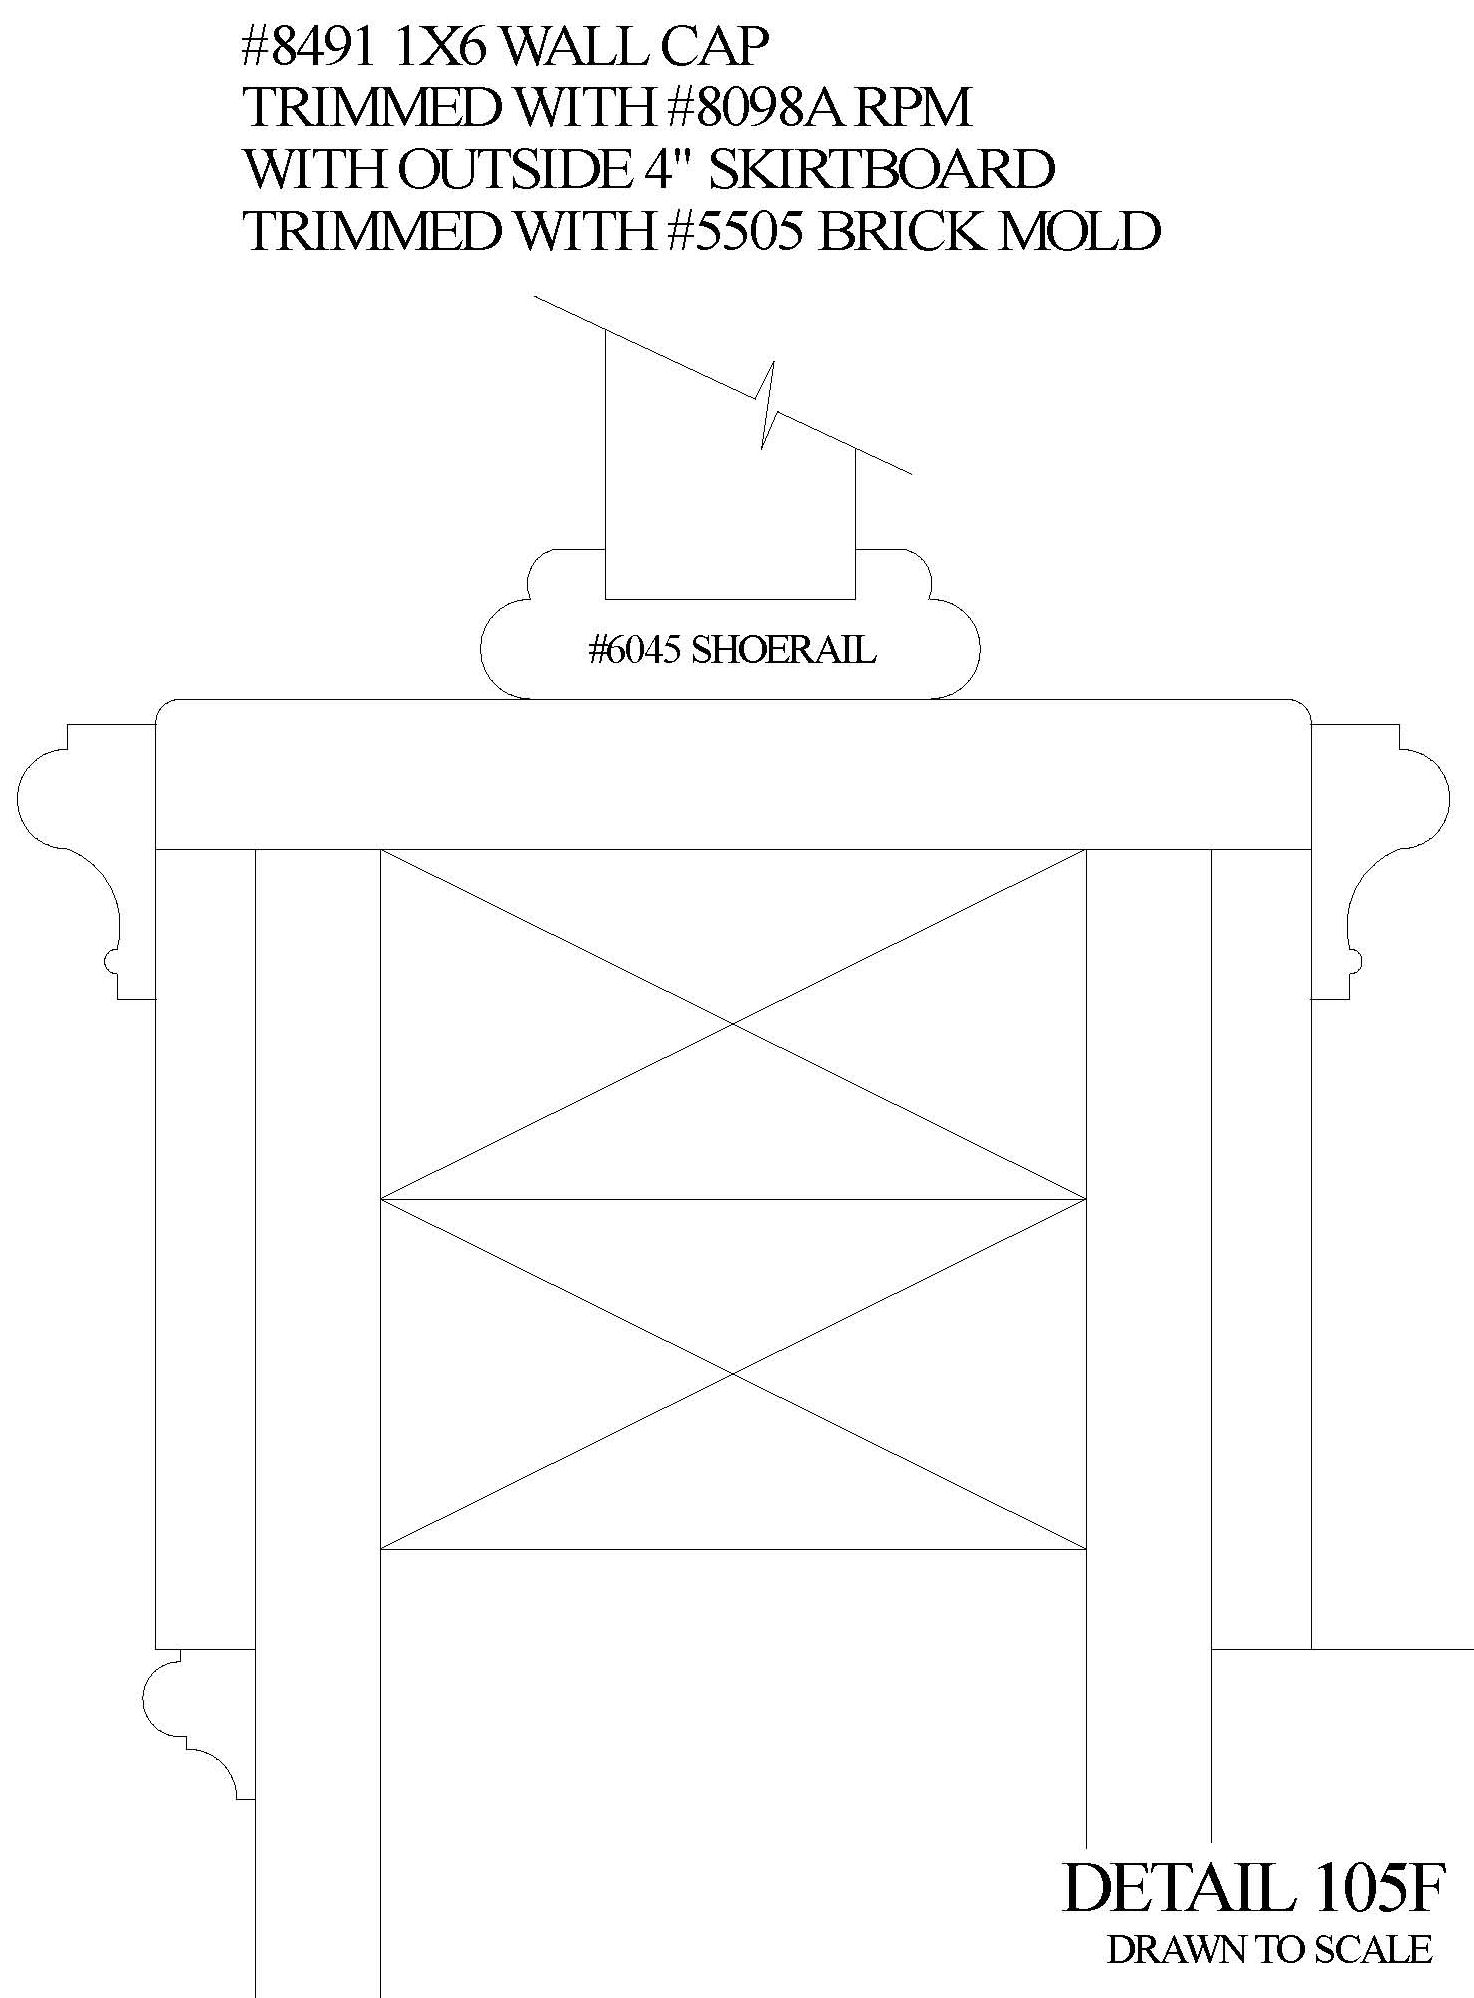
8. Wall Cap Ideas (Cadd Drawings)
Periodically we get calls requesting curb wall (pony wall or knee wall) cap details. Here are some drawings we’ve done over the years for architects in .pdf files for download.


Using the Rise, Run, and Angle tables.
Regarding the geometry of your stair: The unit rise and unit run, referred to as tread depth in the building codes, should always be proportioned to the human stride. Residential stairs should ascend at an angle or pitch between 20 and 38 degrees to assure the most comfortable walk for the age range and abilities of persons occupying homes. Be sure to check the angle tables below; do not just assume that a 45-degree angle for your stair case is going to work, because it really won’t.
The rule of proportion that best suits residential stairs is:
The sum of two riser heights plus the run or depth of one tread should equal between 23-5/8” and 25-5/8”. Be sure to incorporate measurements for stair nosings from top to bottom, as well.
Once you have determined the possible rise and run options from the tables, check them in this simple formula and look up the angle in the angle table to make sure it is between 20 and 38 degrees. (Again: it should not be at a 45-degree angle.)
Determining the geometry should always be done as part of the design process prior to construction in any home improvement project involving stairs and railing height. Your designer should be able to give you this information in advance for you to do comparative walking tests on any number of existing stairways to decide what is most comfortable and meets the design criteria for your home.
However, in existing buildings, the designer is limited to the space that can be made available for the stairway and stair rail. In any case, the geometry of stairs is regulated by the building codes, and you should consult with your local building official.
- The new model code standard developed and published by the International Code Council recognizes 7-3/4” as the maximum rise and 10” as the minimum run or tread depth.
To learn more about measuring rise and run in accordance with the building code please refer to our Visual Interpretations found on the codes & standards page of the Stairway Manufacturers’ Association website.
Rise-Run Stair Angle Chart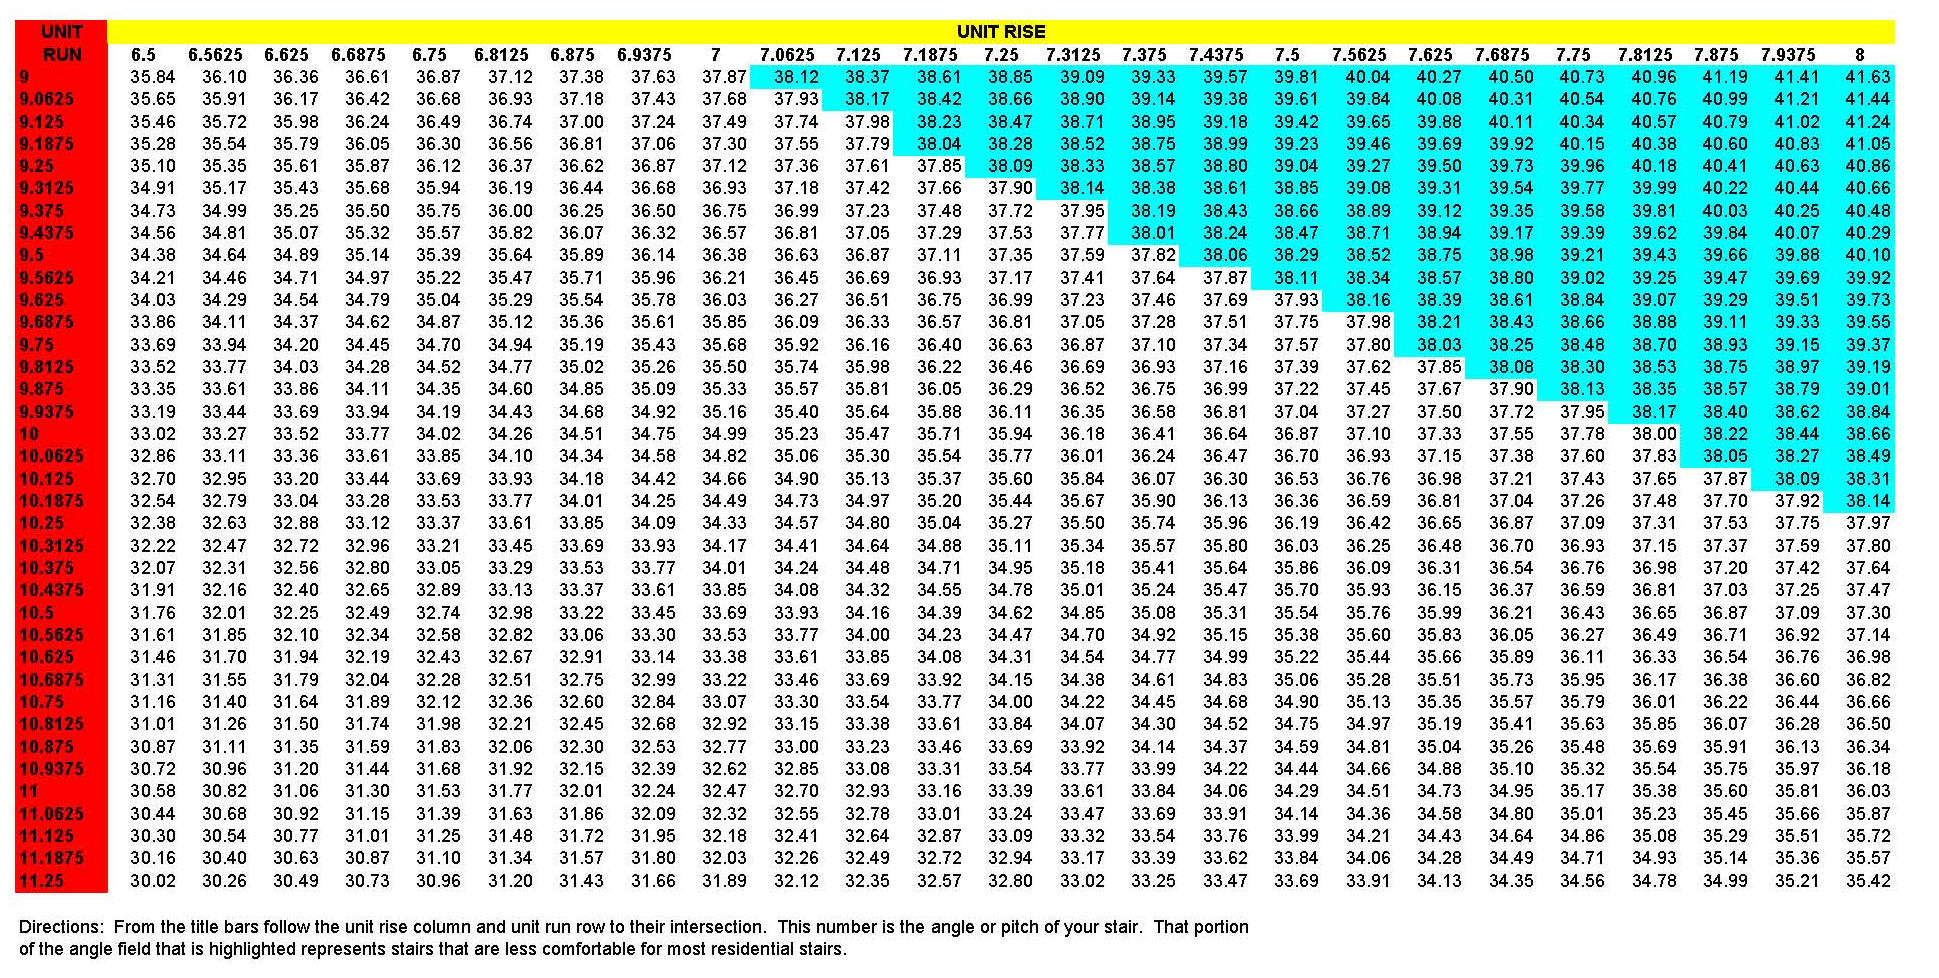
Riser Chart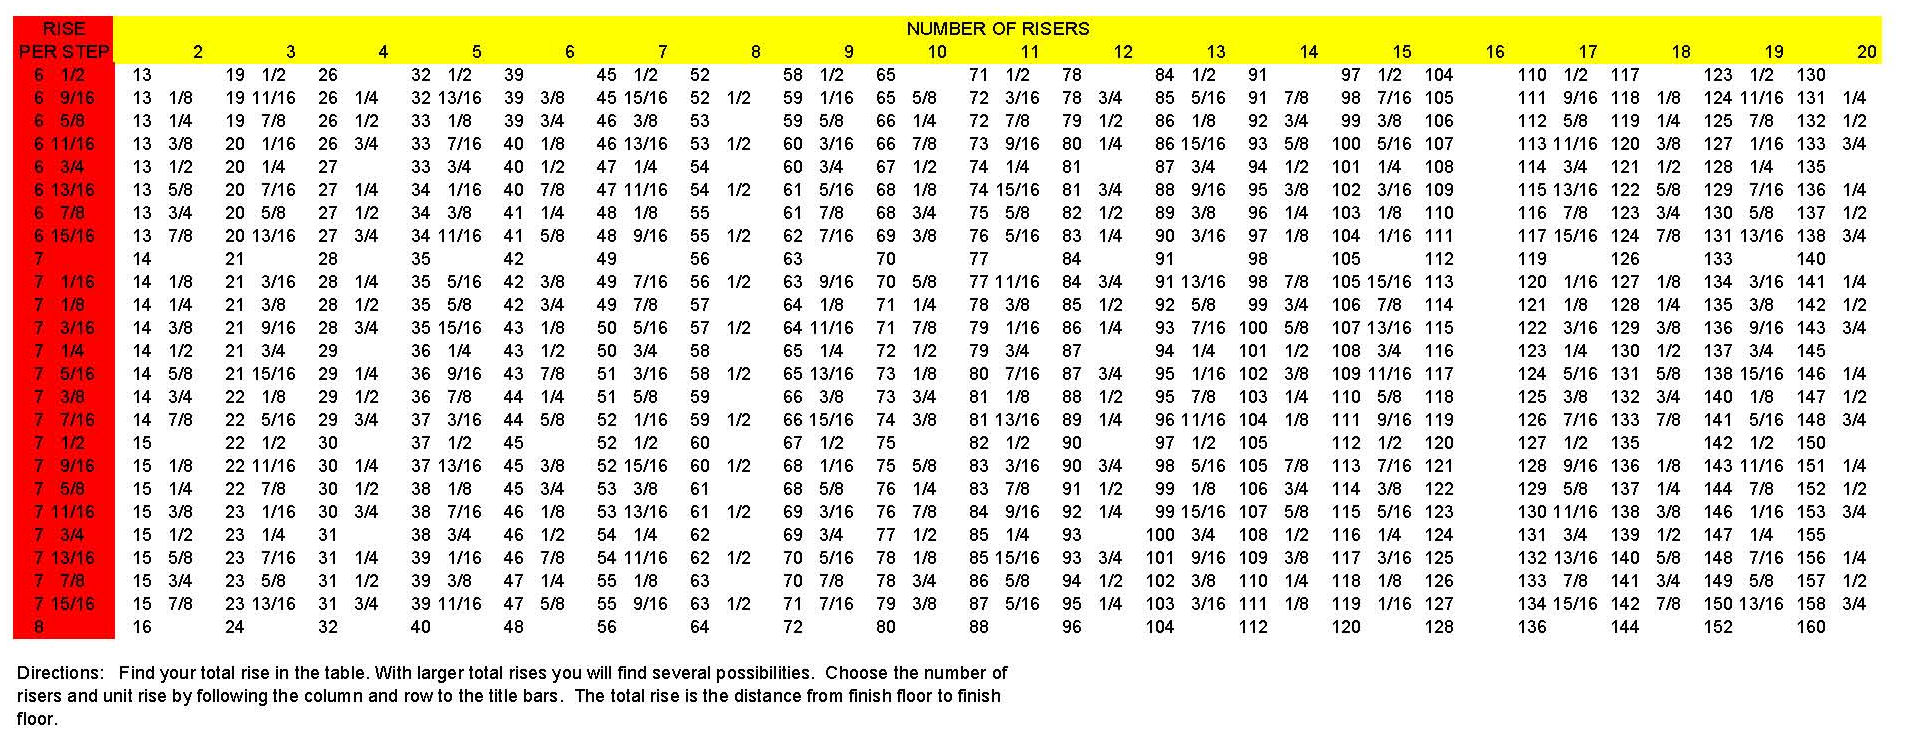
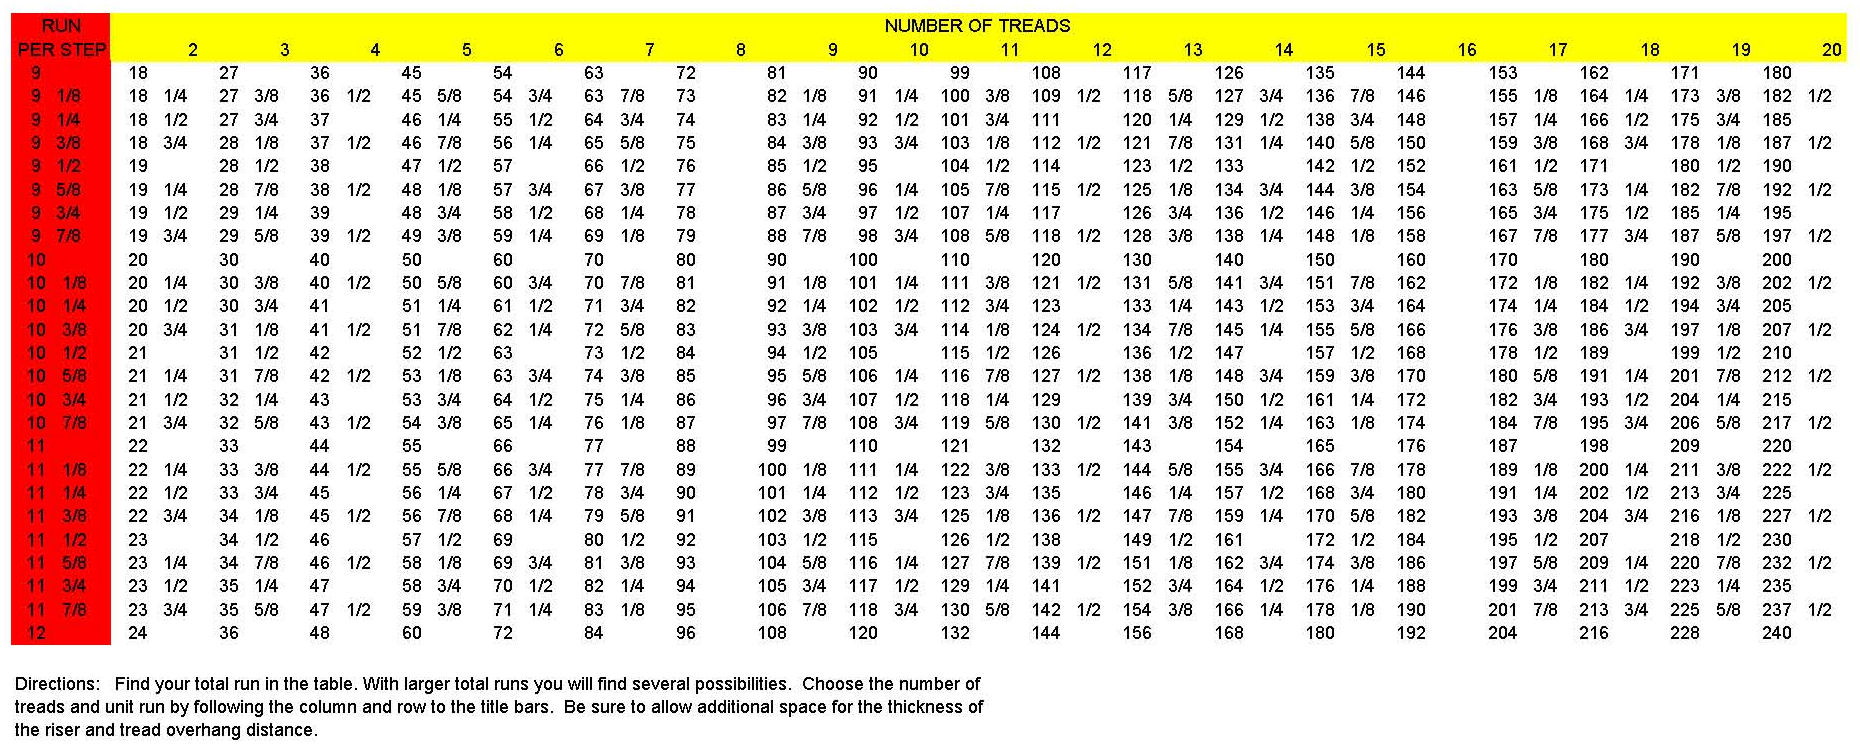
Tread Chart